 Considering the many benefits of worm farming, every household should have a worm farm set up. Worms can eat up to half of their own bodyweight in rotting organic matter every day. This means that 1000 worms can chomp through the food scraps of one family member per day, thus drastically reducing household waste.
The end result of the broken down food scraps in a worm farm is the nutrient rich worm castings and worm tea. ‘Worm castings’ is a nicer name given to worm poo. It can be used as a fertiliser or mixed in with garden soil to drastically enrich it. Worm tea is the liquid collected from a worm farm made up of all the excess moisture. Worm tea can be used as an extremely high quality liquid fertiliser and poured over your favourite plants with excellent rewards.
Although most people use worm farming as a way to gain the above mentioned benefits, there are some who farm worms to use for fishing as a much cheaper alternative to buying them repeatedly for every fishing excursion.
Choosing the right worm farm
There are plenty of different worm farms on the market, most of which are very good.
Generally there are a few key points to focus on before buying your farm. When it comes to worm farms, usually the bigger is best as bigger farms can accommodate for more worms. Most worm farms can hold around 4000 worms at full capacity, meaning that they can consume the food scraps of a family of four. These worm farms are generally suitable for most households although often some families can benefit from keeping two farms.
An important feature of most worm farms is the small tap fitting found at the base of the farm.
This tap allows for quick easy drainage of the worm tea and without it, draining excess moisture could become near impossible. Some worm farms do not come equipped with this tap and should be avoided completely. Depending on where you wish to store your worm farm, shape may come into play when choosing. Most farms are rectangular but round, smaller worm farms are available on the market. The smaller farms often hold fewer worms but can fit into smaller spaces if needed.
Recommended farms include the Reln Worm Cafe and Can O Worms.
Choosing a worm species
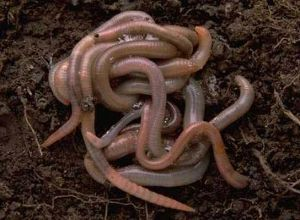
There are several types of worms that are suited to farming, but generally there are two that stand out from the rest.
Red worms (red wigglers) are without a doubt the best species of worm as far as composting goes.
Red wigglers tend to eat around the same amount of food as other species, but breed much faster and flourish in worm farm type environments.
European night crawlers are a preferred species for fishing with. Night crawlers eat around the same amount as red worms, but breed slower. They are much larger and juicier than most other species and work well in a worm farm.
Worms that have been dug up from the garden are almost always unsuitable for worm farming and will not breed.
Preparing your worm farm
Before your worms are placed into your farm, the farm will need to be prepared accordingly.
Most worm farms come with a bedding block provided. This block is usually made out of compressed coconut husks or other organic material. If you worm farm came with this bedding block, soak the block in a large bucket of warm water, leave to soak for a few minutes and break it up into the bottom tray of your worm farm.
If your worm farm was not supplied with a bedding block you will need to add a thick layer of shredded newspaper and top this up with some food scraps (see below).
Once the bedding has been prepared, you can add your worms to the mixture. It is best to start a worm farm with at least 500 worms, 1000 is often preferred. Your new worms come in their own mulch type bedding which is an excellent additive to your farm.
Spread the worms and mulch they come in over the bedding and lightly water in. Some sort of hessian or store bought mat will be needed to be placed over the top of the soil creating a false top soil that food scraps can be placed under.
Feeding your worms
Worms love to engorge themselves with rotting organic matter. Food should be placed on one side of your farm at a time being no more than 1-2 centimetres thick.
If too much food is added at once, your farm will begin to smell and the soil may become acidic (which worms hate). It is best to chop or blend food scraps into smaller pieces to help your worms eat faster making your farm more efficient. They can be fed most household food scraps but there are plenty of foods to avoid.
| Worms can eat | Always avoid |
|
|
Speed up the process
The faster your worms eat, the faster they will reproduce and create castings and tea.
Considering that worms only eat matter that is already rotting, the best way to speed up their food consumption without adding excess food is to create a larger surface area .
Food and vegetable scraps generally rot from the outsite in, so smaller pieces of the same amount of food will have a larger surface area and rot quicker allowing your worms to process the food a lot faster.
Try chopping your scraps with sciscors or even processing scraps through a blender.
Maintaining your farm
Your worm farm needs minimal maintenance to run smoothly. One important aspect is moisture. Worms cannot tolerate dry soil and need to be kept constantly moist. Although fruit and other food scraps provide plenty of moisture for your farm, spraying the top of the soil every day or two with water helps to ensure that soil is always moist and provides extra moisture needed for worm tea. 3 – 5 litres of water can be poured over the topsoil once a week to flush out the worm farm and create a steady supply of worm tea.
Avoiding acidity is extremely important as acidic soil can cause your worms to escape or even die.
In order to avoid acidity, one teaspoon of garden lime or worm farm soil conditioner can be added every week being lightly sprinkled over the top of the soil. Be sure to avoid overheating. If your farm is left in a sunny location or warm area, you can be guaranteed that as soon as they get the chance your worms will make a break for it. Worm farms are best kept in garages, cellars or indoors although shady patio type areas outdoors often suffice.
As each tray in your worm farm is filled, a new tray can be added above it with shredded newspaper and food scraps (especially melon) added to create a bedding that the worms can move into. Over time your worms will move upwards into the new tray.
Using worm castings
Once the top tray of your worm farm has been filled, the bottom tray can be emptied and placed on the top of your farm. The emptied contents are highly useful worm castings which are basically the best fertiliser you can get! Both Worm tea and castings are rich in minerals, potassium, nitrogen, phosphorous, carbon, microbial critters which are excellent for improving soil quality and just about every other nutrient imaginable.
The worm castings can be mixed in with soil to enrich it, scratched into topsoil or just sprinkled around the garden and watered in.
Using worm tea
Worm tea, collected from the liquid tray of your worm farm is equally as good as worm castings if not even better. Containing all the same nutrients as worm castings, worm tea can carry an abundance of nutrients directly through the soil and into the root system of your plants.
The worm tea should be collected at least weekly and can be watered down with up to 80% water to create a weak tea colour. The tea can then be used to water plants as if watering with regular water (a good drink). Depending on the species of plant, benefits of worm tea can often be seen within a day or two of application.
Troubleshooting common problems
Worms trying to escape or sitting on top of soil in large numbers
Most commonly seen when the little critters have been freshly added to the farm. If this is the case for you, don’t be alarmed as they usually calm down after a week or so.
If this is not your problem, other causes can include acidic soil (curable with lime or worm farm soil conditioner) or over heating which can be caused by excess food or an inappropriate storage location.
Tiny white, orange, red or brown mites
These mites are extremely common and found in most worm farms. Mites are certainly nothing to worry about, and can in fact consume large amounts of scraps just like worms can. They do not hurt worms or plants eating only rotting organic matter including dead worms.
Too many worms in worm farm
You cannot have too many worms. Although it may get to a point where it seems that you have too many, your worms will self-regulate their population and stop breeding until numbers decrease.
Tiny flies
Tiny little vinegar flies are often found in and around worm farms. These flies are harmless but can be a nuisance to the owner of the farm. Usually, vinegar flies are caused by acidity or excess food, thus reduction of feeding and applications of lime or farm conditioner can help reduce their numbers.
Smelly worm farm
Caused by over feeding, smelly worm farms can be a hassle trying to fix. Simply stop feeding for a few days and reduce general feeding until worm numbers increase.
Worms crawling down into water tray
There are several reasons why worms end up in the lowest tray (liquid tray) of farms including acidic soil, restlessness from being recently transported and lack of food. Restlessness is fixed with time and lime can be added to reduce acidity. If lack of food is your issue, try placing melon of any type in your highest tray. Melon is their favourite food and seems to attract the worms. Feed your worms more in future.
Soggy soil in farm
Soggy soil is a difficult problem to identify. A lot of people have difficulties in differentiating between wet, damp and soggy, but generally soggy soil is that which seems to have absorbed a lot of water and doesn’t dry out in a hurry. Causes for soggy soil include excess organic matter that has been improperly broken down and overwatering. To fix this issue, stop feeding your worms food scraps for a few days and add shredded cardboard and paper. Reduce watering in future and feed the worms less until they grow in population.
White and grey grubs in farm
These grubs (white grubs) are considered to be a mild pest and love to feast on plant roots. Removing white grubs from a worm farm is relatively easy. Simply sort through your soil a few times and collect the grubs. Try doing this once a month for a couple of months, you should be able to remove any trace of the white grub without seeing any more in future.